Three Norths
Your compass and your map disagree about which way north is, and the gap between them is large enough to put you in the wrong field inside the first kilometer. This is the instrument, the arithmetic that reconciles the two, and the twenty seconds of setup almost everybody skips.
Households and Preppers
Mutual Assistance Groups
Emergency Management Professionals
Look for amber callouts for household and MAG actions, and navy callouts for practitioner notes.
Jump to Section
2. Centerhold, and Why It Wins
3. The Distances Metal Lies At
4. Presetting for a Night Move
5. Why There Are Three Norths
6. Converting: Draw It, Do Not Recall It
7. Back Azimuth
8. What Skipping It Costs
9. Orienting the Map to the Ground
10. The Reading That Proves It
11. Orienting Without a Compass
12. Tools and Further Reading
13. The Bottom Line
There is a particular kind of navigation failure that never announces itself. The compass is working. The map is correct. The arithmetic was done. And the person holding both is walking, with total confidence, on a line that will miss the objective by four hundred meters, because a correction was applied in the wrong direction and nothing about a number reads as backwards.
That failure, and two of its close relatives, are what this article is about. All three come from the same root: a compass and a map do not agree on which way north is, and the disagreement is silent.
This is the second of a pair. The first, The Big Oak Problem, covers saying where something is: grid references, map margins, contours and precision. This one covers getting there. It is the reference layer behind NAV-02: Map and Compass Land Navigation, our online course on the same material, and we note below which lesson takes each topic further.
Three Parts of the Instrument
The lensatic compass has been effectively unchanged for decades, because the design is right. Before any technique matters you have to be able to pick one up, hold it the same way every time, and get a number you would bet on. It divides into three parts, and each does a job you will use on every leg you ever walk.
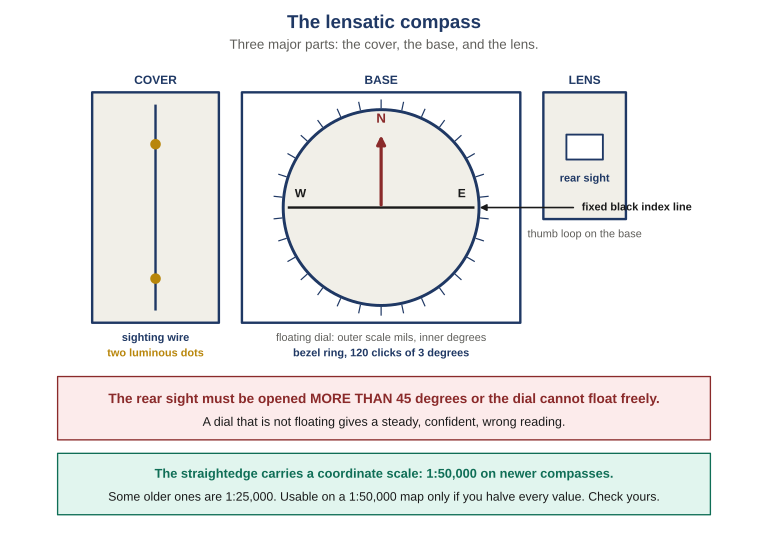
Figure 1 Cover, base, lens. The two details that catch people out are both here: the rear sight has to be opened past forty-five degrees or the dial cannot float freely, and the straightedge along the side carries a coordinate scale whose ratio you need to check against your own map before you trust it.
The cover protects the dial and carries the sighting wire you aim with, with two luminous dots alongside it for night use.
The base carries the floating dial, with degrees on the inner scale and mils on the outer, a fixed black index line to read beneath, and the bezel ring, which clicks 120 times through a full turn at three degrees a click. That last number is what makes a night azimuth possible without any light at all.
The lens magnifies the dial so you can read it while sighting, and carries the rear sight slot. The rear sight also locks the dial when the compass is closed, which is what stops the pivot wearing out in your pocket. Opened less than forty-five degrees, the dial stays locked and the reading is meaningless.
The straightedge on the base carries a coordinate scale, and on newer compasses it is cut for 1:50,000. Some older ones are cut for 1:25,000, which is perfectly usable on a 1:50,000 map provided you halve every value you read, and completely misleading if you do not know which one you are holding. This is the same scale-matching trap as the coordinate scale in the companion article, sitting somewhere people never think to look. Find out which one is on your compass now.
Centerhold, and Why It Wins
There are two ways to hold a lensatic compass, and the one to learn first is centerhold. It is faster than the alternative, it works in any visibility over any terrain, and you can do it while moving.
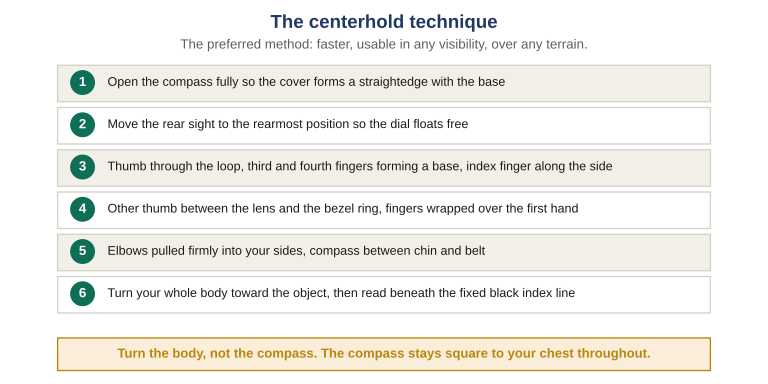
Figure 2 The six steps. The one that does most of the work is the last: turn your body rather than the compass. Elbows locked into your sides makes your torso the tripod, and once the compass is square to your chest, pointing it at something means pointing yourself at it.
The grip sounds fussy written down and takes about a minute to learn with the instrument in your hands. Open the compass fully so the cover forms a straightedge with the base. Move the rear sight to the rearmost position so the dial swings free. Thumb through the loop, third and fourth fingers making a base, index finger along the side. Other thumb between the lens and the bezel ring, remaining fingers wrapped over the first hand. Then pull both elbows firmly into your sides and hold the compass somewhere between your chin and your belt.
To take an azimuth, turn your whole body until the sighting wire lines up with the object, and read the number under the fixed black index line. Not the number nearest the wire. The number under the index line.
The other grip is compass-to-cheek, used when you need a more precise reading of a distant point. Open the cover to about ninety degrees, bring the rear sight up, look through the slot at the object with the sighting wire on it, and read the dial through the lens. It is more accurate and much slower, and it puts the compass in front of your face, which is not always where you want it.
Accuracy is not the only thing that matters in a technique. Centerhold gives you a good reading in a few seconds, standing, moving, or in poor light, and a good reading you actually take beats a better one you skipped because the procedure was slow. Save compass-to-cheek for the moments when a degree or two genuinely changes the outcome, such as a long leg or a resection.
Pick a distinctive object a few hundred meters off and take the azimuth to it five times by centerhold, lowering the compass and resetting your grip between each. Write all five down. The spread across those five readings is the only measure that matters. Within two or three degrees of each other and your grip is repeatable, so you can trust it. Scattered by ten and the grip is the problem, and no amount of technique further down this page will fix it.
The Distances Metal Lies At
A compass needle responds to the magnetic field it sits in. Most of the time that field is the earth’s. Near enough to enough metal, it is not, and the reading you get is a confident, steady, entirely local answer.
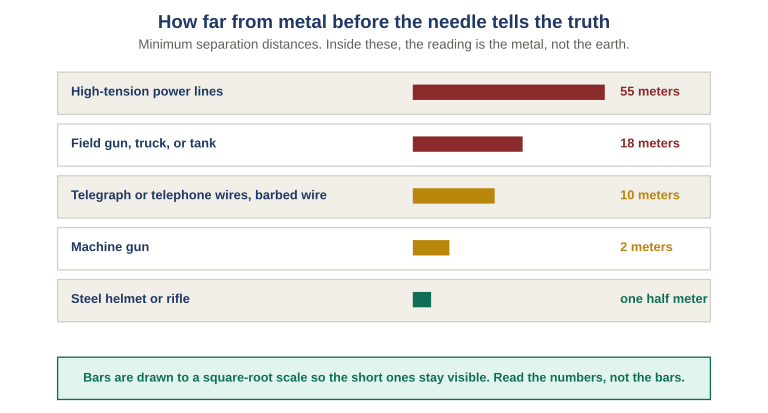
Figure 3 The doctrinal minimums. Fifty-five meters from high-tension lines is further than most people would guess, and it is the one that catches people, because power lines are exactly the sort of long straight feature you naturally stand near when taking a bearing.
Two things about that list are worth holding onto. The first is that half a meter covers a rifle or a steel helmet, which means your own equipment is a real effect and an easily managed one. Hold the compass away from your body and it is solved.
The second is that the failure is silent. A needle deflected by a vehicle does not waver or look wrong. It points somewhere, steadily, and you write it down. The only defense is the habit of noticing what is around you before you read, and that habit has to be built now, because the situation in which you most need a bearing is exactly the situation in which you are least likely to be thinking about the truck you are standing beside.
Presetting for a Night Move
The bezel ring is what makes the compass usable in the dark, and the mechanism is simple once you have felt it. One full turn of the bezel is 120 clicks, and each click moves it three degrees.
To preset an azimuth, hold the compass level in the centerhold position and turn the bezel until the luminous line sits over the fixed black index line. That is your zero. Then count clicks: divide the azimuth you want by three and turn that many clicks counterclockwise. For an azimuth of 51 degrees, seventeen clicks. Now the luminous line marks your direction of travel, and you follow it by keeping the north-seeking arrow lined up under it, all by feel and glow, with no light at all.
Three degrees per click means the bezel can only express azimuths that are multiples of three. An azimuth of 52 degrees presets as either 51 or 54, so you are walking up to two degrees off. Over a hundred meters that is about three meters of error, which is nothing. Over two kilometers it is seventy, which is not. Know which kind of leg you are on, and check against the dial in whatever light you have when the distance is long.
Grip, standoff and the bezel preset are worked with the instrument in your hands in NAV-02 Lesson 01, including the five-reading spread test and a deliberate reading taken a meter from a vehicle so you see the size of the lie for yourself.
Why There Are Three Norths
You can now take a repeatable azimuth. The problem is that the number your compass gives you and the number you measure on your map are not the same number.
True north is the direction of the geographic north pole, the axis the earth turns on. It is fixed, and it is the north that latitude and longitude are built on. Marked with a star.
Grid north is the direction the vertical grid lines run on your map. It is a construction: a flat rectangular grid laid over a curved earth, so the lines cannot all point at the pole. Near the center of a grid zone the difference is negligible, and toward the edges it is not. Marked GN.
Magnetic north is where a compass needle points, which is the magnetic pole rather than the geographic one. It sits some distance from true north and it moves, slowly, but enough that a decades-old sheet may state a value that has drifted. Marked MN.
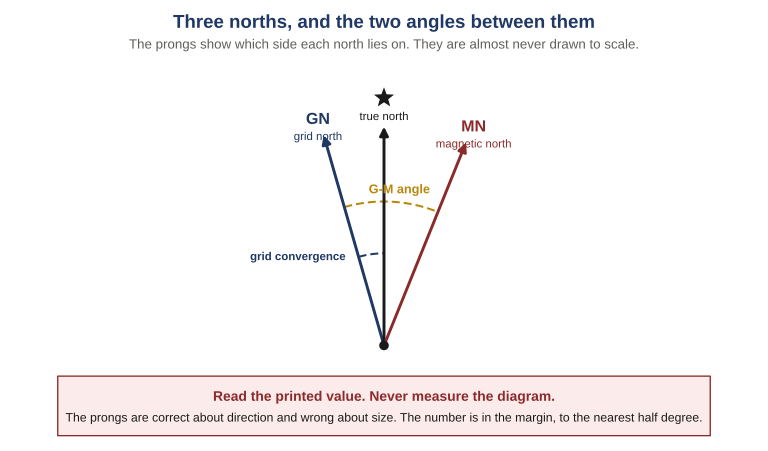
Figure 4 The two angles the diagram records. Grid convergence sits between true and grid north and is mostly of academic interest to a ground navigator. The G-M angle, between grid and magnetic, is the one you will use on every leg, and the prongs show which side each north lies on while being deliberately not to scale.
Only one of these matters to a navigator with a map and a compass: the angle between grid north and magnetic north, called the G-M angle. Your compass reports magnetic azimuths. Your map is drawn to grid north, and every azimuth you measure on it is a grid azimuth. Moving a direction between the two means adding or subtracting the G-M angle.
The prongs on a declination diagram are correct about which side each north lies on and are almost never drawn to scale. Protract the angle off the diagram and you will get a number that has nothing to do with your sheet. The real value is printed beside it in the margin, stated to the nearest half degree with a mils equivalent. That printed number is the only one to use.
Converting: Draw It, Do Not Recall It
Here is where most people go wrong, and where most instruction makes it worse by handing over a rhyme. Rhymes can be recalled backwards, and a conversion applied backwards is not a small error. It is double the G-M angle, in the wrong direction, which on a twelve-degree sheet means twenty-four degrees off.
The doctrinal method is a sketch, and it takes about fifteen seconds.
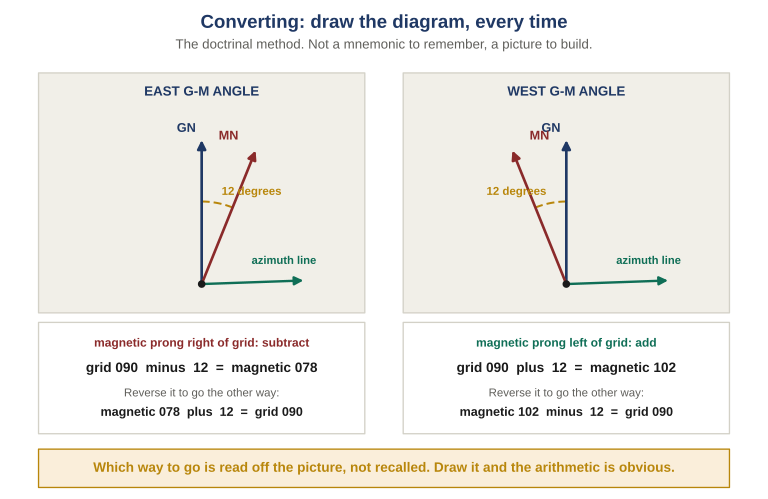
Figure 5 Left, the magnetic prong lies right of grid, so a grid azimuth converts to magnetic by subtracting. Right, it lies left, so you add. The point is that you do not remember which. You draw the prongs the way your own sheet shows them, add any azimuth line, and read off whether the angle you want is bigger or smaller than the one you have.
- Draw grid north. A vertical line, aligned with the vertical grid lines on your map.
- Draw an azimuth line from the base of the grid line, at roughly a right angle. Any azimuth. Its actual value does not matter.
- Draw the magnetic prong on the correct side. Look at your sheet’s declination diagram and see whether magnetic north lies east or west of grid north, then draw it on that side from the same origin. This is the only step that depends on your particular map, and it is the step the rhyme tries to replace.
- Arc from each north to the azimuth line. One arc is visibly larger than the other. That tells you whether the number you want is bigger or smaller than the number you have, so you know to add or subtract.
It is worth being precise about why the drawing works: an azimuth is always measured clockwise from its reference direction, whichever north that is. Once both arcs are on the page the comparison is visual, and there is nothing left to misremember.
Two rules of arithmetic go with it. There are no negative azimuths, because zero and 360 are the same point on the circle, so if a subtraction would take you below zero, add 360 first and then subtract. Likewise, if an addition takes you past 360, subtract 360 from the result. An azimuth of 358 plus 12 is 010, not 370.
Back Azimuth
A back azimuth is the direction you came from: the same line, faced the other way. You use it to check that you are still on a leg, to walk back along one, and to convert a bearing taken at a distant feature into a line drawn from that feature toward you, which is the basis of resection.
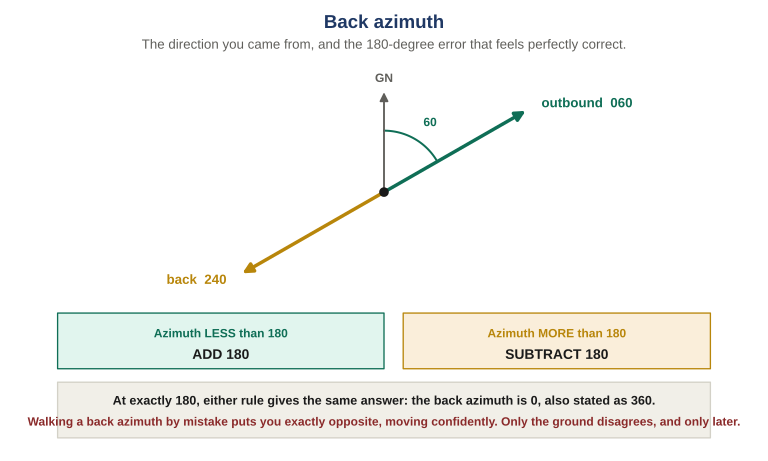
Figure 6 One line, two numbers. Add 180 to an azimuth below 180; subtract 180 from one above it. At exactly 180 both rules agree and the answer is 0, also written 360. The arithmetic is trivial, which is precisely why walking a back azimuth by mistake is so easy: nothing about the number looks wrong.
The failure worth naming here is not the arithmetic. It is taking a bearing to a feature and then walking it, when what you needed was to walk toward the place the bearing was taken from. That puts you exactly 180 degrees out, moving with complete confidence, and nothing on the compass will tell you. Only the ground will, and usually not for a while.
What Skipping It Costs
Numbers make this concrete. An error of one degree puts you roughly 17 meters wide at a kilometer. That is the rule of thumb worth memorizing: one degree is about 17 meters per kilometer, or near enough one in sixty.
| What went wrong | Off at 1 km | Off at 2 km |
|---|---|---|
| One degree of ordinary error | 17 m | 34 m |
| A 12-degree G-M angle ignored entirely | About 200 m | About 400 m |
| The same G-M angle applied backwards | About 400 m | About 800 m |
| An unoriented map, 40 degrees out | Nearly 700 m | Nearly 1,400 m |
Notice which row is worst. Ignoring the correction entirely is half as bad as applying it in the wrong direction, and applying it in the wrong direction is what a half-remembered rhyme produces. You would be in a different field, on a different feature, still holding a compass reading exactly what you set it to.
The conversion sketch is built for your own sheet and then tested against real ground in NAV-02 Lesson 02: measure a grid azimuth between two features, convert it, stand at the first one, set the magnetic azimuth, and find out whether the compass actually points at the second.
Orienting the Map to the Ground
A map is oriented when it lies flat with its north pointing at north on the ground. Until that is true, the sheet is a picture of somewhere rather than a model of where you are standing, and every judgment you make from it about left, right, ahead or behind is a guess.
Hold a map any old way and you can still read grids off it, measure distances and identify features. None of that needs orientation. What needs orientation is every question of the form which way. Unoriented, you have to perform a mental rotation every time you look from paper to ground, and that rotation is where people fail. It is not a hard skill so much as an easy one to get subtly wrong under stress, in the dark, or when tired. Orient the map and the rotation is done once, physically, by turning the paper.
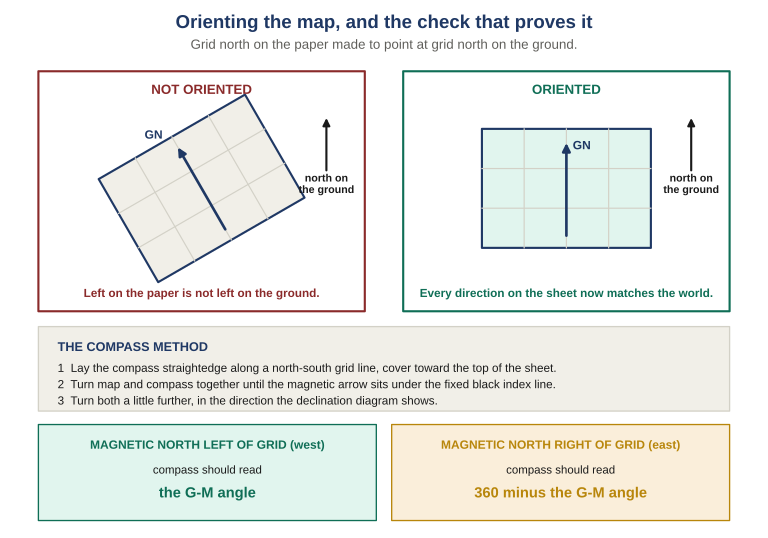
Figure 7 The same sheet, held two ways. On the left, grid north on the paper points somewhere other than north on the ground, so nothing about the map’s geometry can be trusted against what you see. On the right it matches, and every direction on the sheet is now a direction in the world.
Three steps with a compass
- Lay the compass on a grid line. Map flat. Put the straightedge on the left side of the compass alongside any north-south grid line, cover pointing toward the top of the sheet. This puts the fixed black index line parallel to the map’s grid north.
- Turn map and compass together, keeping them aligned as one unit, until the magnetic arrow sits beneath the fixed black index line. Both together: move the compass alone and you have measured something instead of orienting anything. The map is now close to oriented, but not there.
- Turn a little further, toward the declination. Rotate both again in the direction your sheet’s declination diagram shows magnetic north to lie. Step two alone would leave the map aligned to magnetic north, and the map is drawn to grid north. This is the same G-M correction as above, made by turning the sheet instead of doing the arithmetic.
The Reading That Proves It
This is the part worth remembering, because it turns orienting from something you hope you did right into something you can check. Once the map is oriented, look at what the compass reads.
| If your sheet shows | The compass should read |
|---|---|
| Magnetic north left of grid north | The G-M angle itself. On a sheet with an 11-degree westerly declination, the compass reads 11 degrees. |
| Magnetic north right of grid north | 360 minus the G-M angle. On a sheet with a 21-degree easterly declination, the compass reads 339 degrees. |
If the number matches, the sheet is oriented. If it does not, something in the sequence went wrong and you know before you act on it. Very few steps in navigation confirm themselves like this, and it costs you a glance.
Then leave the map where it is. Any change of position takes it back out of line, and it is easy to shift the sheet without noticing while reading it, folding it, or sheltering it from rain. If you have moved it, orient it again. Twenty seconds is cheap. Working from a sheet you believe is oriented and is not is the whole problem this section exists to solve.
Orienting Without a Compass
A map can also be oriented by terrain association, and there are two situations where you would rather do it that way: when you have no compass, and when you are moving and need many quick checks rather than one careful setup.
The method is to match what you can see to what the sheet shows. Find two or three features you can identify with confidence, a ridgeline, a road junction, a lake, the shape of a valley, and turn the map until its picture of them agrees with the view. A long linear feature is the easiest anchor: a road or a stream that runs across your front on the ground should run across your front on the paper.
It requires two things. You need to know roughly where you are already, because the same shapes repeat across a sheet. And you need features distinctive enough to be certain about, which is what contour reading is for, and is covered in the companion article.
The compass method is precise, self-checking, and slow enough that you will not do it every two minutes. Terrain association is fast, approximate, and available while walking. Use the compass to set up at the start of a leg or whenever you are uncertain, and terrain association continuously as you move. They are not rivals. The second one is how you notice that the first one needs doing again.
Orient the map by compass, confirm it with the reading above, then close the compass, deliberately turn the map out of line, and orient it again by terrain alone. Now check that second attempt with the compass. Most people come within about ten or fifteen degrees on a first try, which is fine for staying aware while walking and not good enough to start a leg from. Knowing your own figure is what tells you which of the two you are allowed to trust.
Orienting, the confirming reading, and both methods run back to back at the same spot are NAV-02 Lesson 03.
Tools and Further Reading
Two things make the material above easier to practice, and neither costs much.
MapTools is the specialist supplier, and their catalog came out of ground search and rescue work rather than out of a marketing department. For the material on this page specifically:
- North references for navigating with map, compass and GPS — their own treatment of the three norths, useful as a second explanation if the sketch method has not clicked yet.
- Plotting a bearing onto your map — the paper half of the work, which is where a converted azimuth actually gets used.
- Compass video walkthroughs — worth watching before your first attempt at centerhold, since a grip is easier to copy than to read about.
- Stock tools listed by scale and free printable PDF tools — protractors, roamers, rulers and compass roses. Copyrighted, but copying is permitted on a not-for-profit basis.
Fortune Favors the Prepared has no affiliation with MapTools and earns nothing from these links.
Magnetic north moves, so a G-M angle printed on an older sheet has drifted from the value in force today, and the amount depends on where you are and how old the sheet is. That matters most where a group is working from a pre-positioned map series of mixed vintages, because two people can do the arithmetic correctly, from correctly printed values, and still disagree. It matters again with any device that holds a manually entered declination, since that value is only as current as the last person who set it. Standardize the sheet edition and the declination value together, state both in the briefing, and check them at the same time you check position format and datum.
The layer underneath all of this, covering the constellations, how receivers use them, and every setting on a handheld including the true-versus-magnetic display choice, is our reference article on GNSS and handheld GPS setup.
The Bottom Line
Try this before you close the page. Pick a place you might genuinely have to reach on foot, without a vehicle and without a phone: a rally point, a relative’s house, a cache, somewhere on the far side of your own ground. Write down how you would get there right now, in the detail you would actually use.
Then ask three questions of what you wrote. Does it depend on roads, signs, or recognizing places you have seen before? Would it survive darkness, fog, or a route that has changed since you last went? And at any point along the way, could you tell whether you were still on track, or only whether you had arrived?
That third question is the one that separates a route from a recollection. Most first attempts can tell you when you have arrived and give you nothing in between, which means the first sign of a mistake is the absence of the thing you were walking to.
Everything on this page exists to fill that gap. A repeatable grip gives you a number you would bet on. The G-M angle makes that number mean the same thing on paper as it does on the ground. A back azimuth lets you check the line you are on rather than waiting to see where it ends. An oriented map turns every glance into a comparison instead of a mental rotation. None of it requires a battery, and none of it requires equipment you cannot buy for the price of a tank of fuel.
The one thing it does require is that the arithmetic be done in the right direction, which is why the sketch beats the rhyme. Fifteen seconds with a pencil, on a card kept with the map, against four hundred meters of confident walking in the wrong direction.
This article is the reference layer for the first part of NAV-02: Map and Compass Land Navigation, which continues past it into pace count, dead reckoning, deliberate offset, terrain handrails and catching features, resection and intersection, and the route card that carries a plan somebody else can walk.
Its companion course, NAV-01: Grid Coordinates and Map Reading, is the prerequisite and answers the other half of the question. NAV-01 teaches you to say where something is. NAV-02 teaches you to get there. The reference layer for that half is The Big Oak Problem.