NAV-06 · Lesson 05
Routes, Tracks, and Retracing Your Path
Deciding at the map table instead of on the ground, and knowing which of the two lines on your screen is a plan and which is history.
Reading: about 15 minutes · Field drill: about 1 to 2 hours
A route is a plan: an ordered list of named points with legs between them, built before you move. A track is a recording: a string of positions the device sampled while you walked. They look similar on screen and they are not the same object, cannot be used the same way, and fail in different directions.
The work that makes a route worth having happens at the map table, not in the menus. This lesson covers building one from map recon, doing that on a computer where the screen is big enough to think on, naming points so the whole group can read them, setting a recording interval that keeps what matters, and the specific limits of retracing your own path back out.
1. Two lines that mean different things
Both draw as a line over your map. Everything else about them differs.
| Route | Track | |
|---|---|---|
| What it is | An ordered list of stored points, with legs between them | A string of recorded positions with timestamps |
| When it exists | Before you move | Only after you have moved |
| Made of | Points you chose deliberately, usually a handful | Points the device sampled automatically, often thousands |
| Carries | Your decisions: where to turn, where to check, what to avoid | What happened, including detours and mistakes |
| Reusable | Yes, forwards or reversed, by anyone you send it to | Only as a breadcrumb of one particular trip |
The distinction has a practical edge. A route can be handed to another member and walked without them knowing anything about the ground, because the thinking is baked into the points. A track hands them your afternoon, wrong turns included.
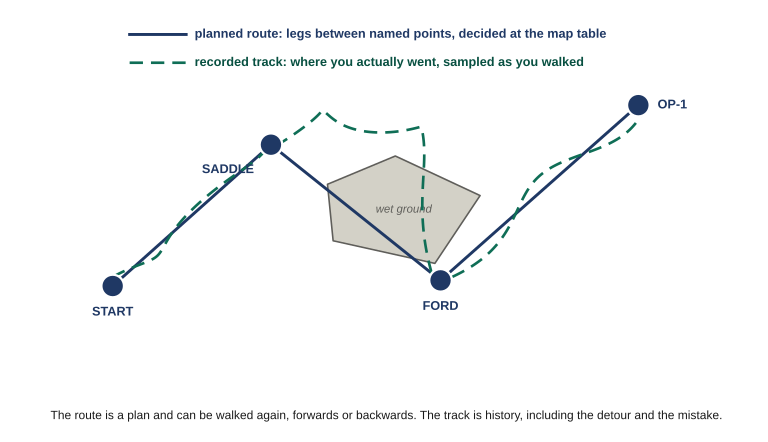
Figure 5.1 Notice where the planned legs run straight through the wet ground: the plan was made from a map that did not show it. The recording is the only one of the two that knows the detour happened.
2. Building a route from map recon
Route building is map work that happens to end in a device. The device is where you store the answer, not where you work it out.
Start on the map with the whole leg in front of you and decide where the turning points are. A good turning point has two properties: it is somewhere a decision actually gets made, and it is identifiable on the ground when you get there. A saddle, a stream junction, a road crossing, a spur nose, a fence corner. A point in the middle of a uniform slope satisfies neither — nothing changes there and you cannot confirm you have arrived.
Then keep the legs honest. A leg that runs four kilometers through broken country is not one leg, it is a place for four kilometers of error to accumulate before anything tells you. Break it where the ground gives you something to check against. The legs do not need to be equal; they need to end somewhere you can stand and say, without the device, that you are where you meant to be.
Every point you put in a route is a decision you have made in advance and will not have to make while tired, wet, or under time pressure. That is the entire value of doing this beforehand, and it is why a route with three well-chosen points beats one with twenty arbitrary ones.
Two things to plan in that are easy to forget. Put a point at anywhere you would want to stop and confirm position deliberately — those become the checkpoints Lesson 06 uses. And plan the route so it is still sensible reversed, because the way out is the way in backwards more often than not.
3. Planning on a computer
You can build a route on the device itself, point by point, on a screen the size of a playing card. It works and it is miserable, and it is why almost nobody does proper map recon that way.
The better approach is to plan on a computer, where you can see the whole area at once, zoom without losing your place, and change your mind cheaply. Garmin publishes BaseCamp free for this: you build waypoints, routes and tracks on the desktop against whatever maps you have loaded, then transfer them to the device over USB. Their device-side documentation treats it as the standard path, alongside the newer Garmin Explore service which syncs the same objects between phone, web and handheld and can push offline maps out to a phone. Other platforms have their own equivalents, and the workflow is the same whichever you use.
→
Step 2BuildEnter the points on the computer, in order, naming each one to the group standard as you go.
→
Step 3TransferSend it to the device, then open it on the device and confirm the points arrived intact.
→
Step 4Print the backupMark the route on the paper map and write the grids down. The plan must survive the device.
→
Step 5Review afterPull the recorded track back onto the computer and compare it against what you planned.
Three cautions come with planning software, and all three have bitten people.
It will route you, and it does not know what you know. Ask most of these tools for a route between two points and they will happily generate one along roads and trails, optimized for distance or time. That is a suggestion from a database, not a plan. It has no idea the bridge is out, the landowner is hostile, or that the obvious trail is the one everybody watches. Use auto-routing to draw quickly, then go back and impose your own turning points on it.
Settings do not travel with the file the way you assume. Datum and coordinate format are display settings at both ends. Check on the device, after the transfer, that the points read where you expect — the same read-back discipline from Lesson 04, applied to a file instead of a keypad.
A cloud-synced plan is a plan stored on somebody else’s computer. The convenience of having routes appear across phone, web and handheld means the route also exists on a server, tied to your account, with timestamps. That is a real capability and a real exposure, and Lesson 08 deals with it properly. For now: know which of your tools sync and which stay local.
4. Names the whole group can read
A route is only transferable if its points mean something to the person receiving it. The device will name them 001, 002, 003, and a route made of those is a route only its author can use.
A workable convention has three parts and stays short enough to read on a small screen:
Put together: RP-MILL-02. Somebody who has never seen your route knows what that point is for, roughly where it is, and where it comes in the sequence, from six characters on a dark screen.
Two rules matter more than the exact scheme. Pick one convention for the whole group and write it into the standard — two members using different schemes produces a shared route nobody can read at speed. And never encode anything in a name you would not want read aloud on an open net, which is a point Lesson 08 returns to.
5. Recording a track
Track recording is usually on by default and quietly running whenever the device is. Three settings control it and they trade against each other.
Whether it records at all. There are good reasons to have it on: reviewing a route afterwards, proving where a team went, and retracing your way out. There are good reasons to have it off, and they are the subject of Lesson 08.
How it decides to drop a point. Devices typically offer automatic, by distance, or by time. Automatic varies the rate to represent the shape of the path efficiently and is the right default. By distance gives you evenly spaced points regardless of speed. By time gives you a point every so many seconds, which produces dense clusters wherever you stop.
How often. This is the real tradeoff, and it is between fidelity on one side and battery and memory on the other.
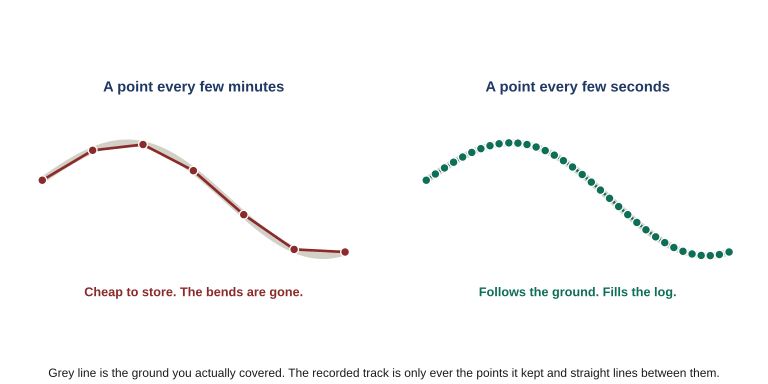
Figure 5.2 A track is never the path you walked. It is the points the device kept, joined by straight lines. Record sparsely and the bends get cut — which matters if you intend to follow that line back through country where the bend was the reason for the turn.
The thing to understand is that a track is never the path you walked. It is the points the device kept, joined by straight lines. Record sparsely and every bend gets cut, the distance comes out short, and a tight turn can vanish entirely — which matters if you intend to follow that line back through terrain where the bend was the reason for the turn.
6. Retracing your path is not following a route
Most devices offer a way to turn your recorded track around and lead you back along it. It is genuinely valuable and it is routinely over-trusted, so be precise about what it does.
It leads you back along where the device recorded you going — sampled at whatever interval was set, including every detour, and only as far back as the current recording extends. That makes it excellent for one specific situation: you are somewhere you got to safely, visibility or light has collapsed, and the highest priority is undoing your own movement exactly. In a whiteout or after dark on ground you crossed in daylight, that is a genuine lifeline.
It retraces your mistakes. If you went the wrong way for twenty minutes and corrected, the return path includes those twenty minutes. Nothing distinguishes the good line from the bad one.
It assumes the way in is still the way out. The creek you stepped over rises. The slope you came down in daylight is a different proposition climbing in the dark. The track records that you passed, not that you could pass again.
It only exists if recording was on. A device that was switched off, cleared, or in a battery-saving mode with logging disabled has nothing to give you. This is a capability you have to have set up before you needed it.
Which is why it is a fallback rather than a plan. A route you built at the map table can be walked forwards, reversed, handed to somebody else, and reconstructed from paper if the device dies. Retracing gives you exactly one thing: your own footsteps back, if the device kept them.
- A route carries your decisions and can be handed to anyone. A track carries one afternoon, mistakes included.
- A good turning point passes two tests: a decision gets made there, and you could confirm arrival without the device.
- Planning software optimizes on map data and knows nothing you know. Let it draw; keep the judgment.
- A track is only the points kept and the straight lines between them. Retracing is a fallback for undoing your own movement exactly, not a plan.
Half of this is at a table and half is on the ground.
- Take a real objective in your area and build a route to it on paper first, marking turning points that satisfy both tests: a decision happens there, and you could confirm arrival without the device. Aim for the fewest points that do the job.
- Build the same route on a computer if you have the software, name every point to a convention you write down, and transfer it. Open it on the device and confirm every point arrived where you meant.
- Walk it. Record the track. At each turning point, confirm you have arrived by looking at the ground before you look at the screen.
- Afterwards, pull the track back and lay it over the route. Where they diverge, work out whether the ground was wrong or the plan was.
- Check your recording interval and work out how long the device would log for at that setting. If you do not know, that is the finding.
Keep the route and the naming convention. Lesson 10 builds the group standard on top of them.
| ← Lesson 04: Core Operations |