NAV-06 · Lesson 04
Core Operations
Getting a written position into the device without corrupting it, getting yourself to it, and recording a position worth keeping.
Reading: about 12 minutes · Field drill: about 1 hour
This lesson assumes you can already store and recall a position on your device — that ground is covered in NAV-01. What it adds is the operating discipline around those actions: how a correct coordinate gets corrupted between paper and screen, what the navigation pointer is actually telling you, and why a position averaged for thirty seconds is not averaged at all.
Three habits come out of this lesson and they are worth more than any menu path: read back from the device, not from your notes; know the difference between the direction to your destination and the route you planned; and give an averaged position the time it needs or do not call it averaged.
Somebody reads you a position over the radio, or hands you one on a scrap of paper, and you type it into your device. That is the single most error-prone action in this entire course, and none of the errors announce themselves. A transposed pair of digits produces a coordinate that is perfectly well formed and lands on real ground. A digit dropped from the end silently coarsens your precision by a factor of ten. The device accepts all of it without complaint.
Lesson 03 dealt with the two settings-level failures — wrong datum, wrong format. This is the third failure, and it is human rather than technical. The defense is a fixed sequence you run every time, including the times you are certain you do not need it.
→
Step 2Enter itType the digits. Do not abbreviate, do not round, do not fix anything that looks odd.
→
Step 3Read back from the screenRead the position aloud off the device, and have the sender confirm against their original.
→
Step 4Sanity-checkLook at the distance and bearing the device now shows. Does that match roughly where you expect the point to be?
→
Step 5Name itSave it under a name the whole group would recognize, not the default the device offers.
Step 3 is the one people skip, and it is the one that works. The instinct is to check your typing against the paper you copied from — but if you misread the paper, you will misread it the same way twice and the check passes. Reading off the device and confirming against the sender closes the loop at both ends. It is the same reason a radio operator reads a message back rather than saying “got it.”
Step 4 is nearly free and catches the errors that survive step 3. If a point should be two kilometers northeast and the device says eleven kilometers southwest, something is wrong even though every digit was confirmed — and it is usually format or datum rather than typing.
2. Going to a stored position
You select the point, tell the device to navigate to it, and get a pointer, a bearing, and a distance. All three are simpler than they look, and one of them is routinely misread.
The bearing and the pointer aim at the destination from wherever you are standing right now. They do not describe the route you planned, and they do not know about the terrain in between. Every time you move, the bearing updates, so following the pointer traces a curve rather than a straight line if you drift at all.
The distance is straight-line distance to the destination — not distance along your route, and certainly not walking distance. On flat open ground the difference is small. In a drainage system, on a road network, or anywhere you cannot walk through what is in front of you, it can be off by a factor of two or more. A member reporting “eight hundred meters out” from a device is reporting how far away the point is, not how far they still have to walk.
The pointer answers “which way is it from here.” It does not answer “which way should I go.” Those are the same question on open ground and different questions everywhere else, and the device cannot tell the two apart.
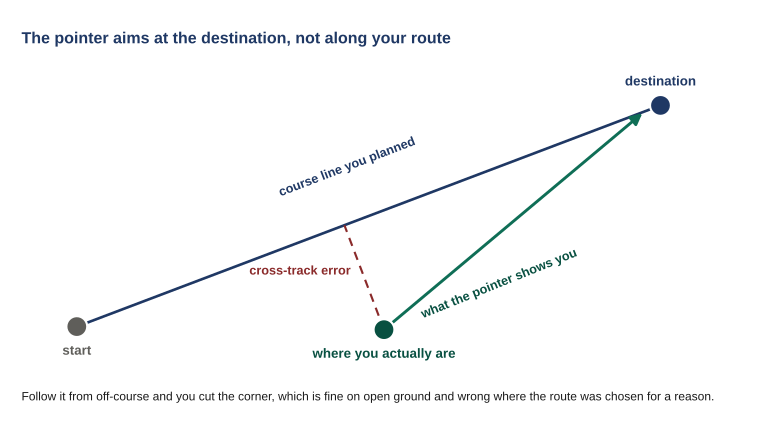
Figure 4.1 Cross-track error is the number that tells you how far you have drifted from the line you chose. The pointer will not mention it, so if the route mattered, that is the figure to put on screen.
Most devices can also show your relationship to the original course line rather than just the direction to the destination. That distance to the side of your planned line is cross-track error, and it is the number that tells you whether you have drifted off a route you chose deliberately. If the route mattered — because of terrain, because of a hazard, because somebody else is walking it too — cross-track is the number to watch, not bearing.
3. Recording a position worth keeping
There are two different reasons to record a position, and they deserve different amounts of effort.
Marking on the move is what you do when something matters and you are not stopping: a vehicle, a blocked route, a casualty collection point, a track junction. One press, keep walking, fix the name later. The position is worth whatever the fix was worth at that instant, which is usually fine.
Recording a fixed site is different. A cache, a rally point, a water source, a helicopter landing site — somewhere a person will have to find in the dark, possibly on somebody else’s directions, possibly months later. That deserves a better position than one press gives you, and the tool for it is position averaging.
What averaging actually does, and what it needs
Averaging takes repeated fixes at the same spot and combines them, on the reasoning that random error falls on all sides of the truth and cancels out with enough samples. That reasoning is sound. The catch is the word random.
Two fixes taken thirty seconds apart are computed from very nearly the same satellites in very nearly the same positions in the sky, with the same atmosphere in the way and, if you are near a rock face, the same reflection arriving. Their errors are not independent — they are almost the same error twice. Average fourteen of them and you have carefully computed the average of one error, which is that error.
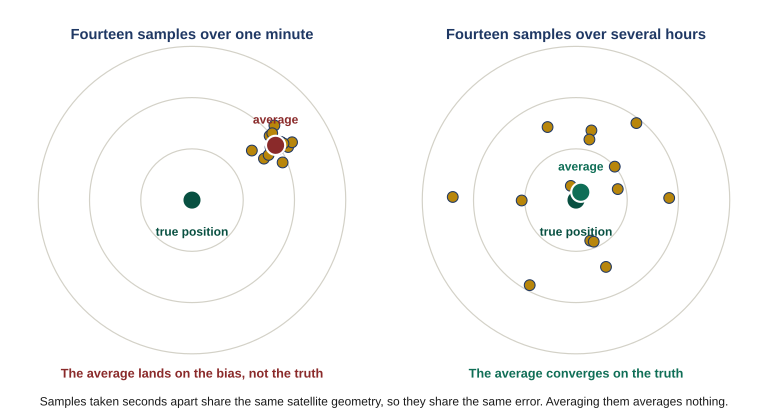
Figure 4.2 Fourteen samples taken inside a minute share the same satellite geometry, so they share the same error and their average lands on the bias rather than the truth. Fourteen taken over several hours see the geometry change, fall on different sides, and converge. Averaging only removes error that differs between samples.
Getting genuinely independent samples means letting the geometry change, and the geometry changes on the satellites’ schedule rather than yours. Manufacturer guidance is consistent on this and more demanding than most people expect: collect four to eight samples, with at least ninety minutes between them. That turns a cache position into an afternoon rather than a minute — which is the honest cost, and worth paying exactly once for a site you will rely on for years.
Standing still and letting the device average for thirty seconds feels like diligence and produces a number with more decimal places, which makes it feel earned. It is not. It smooths the jitter and leaves every systematic error exactly where it was, while handing you a result that looks more trustworthy than the single fix you started with.
If you do not have the time to do it properly, take a single fix and record it as a single fix. A position you know is rough gets treated as rough. A position that is rough but looks precise gets acted on.
4. Reading the accuracy figure in the field
Lesson 01 established what the accuracy number is: the receiver’s estimate of its own work, honest within its own terms and blind to the errors it cannot detect. Here is how that translates into action.
Use it as a relative signal, not an absolute one. Its most useful property is how it changes. A figure that climbs as you enter a drainage is telling you something real about the drainage. A figure that is unchanged while your plotted position jumps around is telling you the device does not understand what is happening to it — which is more informative than the number itself.
Compare it against what you are about to do with the position. Marking a vehicle you will walk back to in daylight, almost any figure will do. Passing a grid that somebody will fly a helicopter to, or recording a cache you will look for at night, and the same figure is not remotely good enough. The number does not change; the standard you hold it to does.
Never let it substitute for looking at the ground. A healthy accuracy figure and a wrong position coexist comfortably, and every one of the settings failures from Lesson 03 produces exactly that combination. The figure is one input. The terrain in front of you is the other, and Lesson 06 is where the two get formally reconciled.
5. Naming, briefly
Every position you save gets a name, and the device will happily supply one like 017. That is fine for a mark you will use in the next twenty minutes and useless for anything else — particularly for anything another member has to find in a list on a dark screen.
A workable name says what the thing is and where, in a form that sorts sensibly: purpose first, then a short locator. The full naming convention is a group decision and it belongs with routes, so Lesson 05 sets it properly. For now, the rule is simply that a default number is not a name, and renaming is easier standing still now than searching later.
- Read a position back off the device and have the sender confirm it. Checking your typing against the paper you copied from reproduces your own error.
- The pointer answers “which way is it from here,” not “which way should I go.” The distance it shows is straight-line, not walking.
- Averaging only removes error that differs between samples. Four to eight samples, ninety minutes apart, or record it honestly as a single fix.
- The most informative thing the accuracy figure does is fail to react while the position moves.
All four parts on real ground with the device you carry.
- Have somebody read you a position out loud from a map, in a format you did not choose. Enter it running the five steps above, out loud, including the read-back. Note where in the sequence you wanted to cut a corner.
- Navigate to a point roughly a kilometer away across ground that is not flat and open. Before you start, write down what you think the walk will be. Compare that against the straight-line distance the device reports, and against how long it actually takes.
- Pick a site you would genuinely cache something at. Take a single fix and write it down. Then take a second fix at the same spot at least ninety minutes later and write that down too. Measure how far apart they are. That distance is the error you were about to accept.
- Look through the saved positions already on your device. Count how many you could identify from the name alone, without opening them.
Keep the results with the sheets from Lessons 01 through 03.
| ← Lesson 03: Device Selection and Configuration |