NAV-06 · Lesson 03
Device Selection and Configuration
The highest-value lesson in this course. Four settings decide whether a perfectly correct coordinate means anything at all.
Reading: about 35 minutes · Field drill: about 45 minutes
Lessons 01 and 02 were about what the device can and cannot know. This one is about what you tell it. A receiver with a flawless fix will still hand you a number that puts a search party in the wrong drainage if the datum, the coordinate format, or the north reference does not match what the person on the other end is working from.
None of these are exotic settings. They sit three menus deep on every device, they are set once at the factory, and almost nobody checks them. A datum mismatch alone can move a correct coordinate by more than a hundred meters without a single thing on the screen looking wrong. That is the failure this lesson exists to prevent, and it is the reason this is the lesson to reread before a trip.
1. Choosing what you carry
Before the settings, the hardware — briefly, because the settings matter more. Four categories of device show up in a group, and they are not interchangeable.
| Type | Strength | Weakness that matters |
|---|---|---|
| Dedicated handheld | A large, well-placed antenna built for sky view. Runs on common cells you can carry spares of. No dependency on any ground infrastructure. | Another thing to buy, carry, and stay current on. Screens are small and slow. |
| Phone | Always with you, excellent screen, and its receiver is genuinely capable. Free mapping applications are very good. | A compromised antenna in a metal body, a battery you cannot swap, and three of its four positioning sources depend on infrastructure. |
| Watch | On your wrist, hands free, and current models carry serious multi-band receivers. | A screen too small for map work, and on many models the settings you are about to learn are buried or unavailable. |
| Vehicle unit | Powered from the vehicle, large screen, no battery anxiety at all. | Stops existing the moment you leave the vehicle, which is the moment you need it. |
Two hardware facts are worth more than the rest of that table. The first is battery chemistry: alkaline cells lose a large fraction of their capacity as temperature drops, so a device that runs all weekend in July can die in a few hours in February. Lithium cells hold up in the cold and are the correct choice for winter carry. The second is that a handheld running on cells you can carry spares of is genuinely independent of everything else in your kit, which is what makes it a real second leg of the PACE plan rather than a duplicate of the first.
Why the phone is a different animal
The phone deserves its own paragraph because its blue dot is not what most people think it is. A phone does not simply report a satellite fix. It reports a fused estimate assembled from up to four sources, weighted by which are available and how much the operating system trusts each one.
Assisted GPSOrbital data downloaded over the cell network instead of decoded from the satellites, which turns a minutes-long cold start into seconds.Needs cell data
Cell tower positionSignal strength and timing from nearby towers. Accurate to a few hundred meters at best, several kilometers in open country.Needs live towers
Wi-Fi positionNearby network identifiers looked up against a database of where those networks have previously been seen.Needs powered Wi-Fi
Now consider what a serious event does to that list. Towers lose power or backhaul. Wi-Fi access points go dark with the grid. Assisted data cannot refresh without cell service, so the cached orbital data ages out. Three of the four sources fail together, in exactly the conditions where position matters most — leaving a compromised antenna working from stale data, reporting a number with the same confident blue dot it always shows.
This is not an argument against phones. It is the argument for why the handheld exists, and for why the alternate leg of your PACE plan should not be a second device that fails the same way for the same reason.
And the watch on your wrist
Watches divide into three categories that look identical on the wrist and behave completely differently the moment the phone is not there.
| Category | What it does without a phone |
|---|---|
| Dedicated outdoor GPS watches | Full standalone position and navigation from their own multi-constellation receiver, current models often dual-frequency. Topographic maps stored on the watch. Declination applied automatically from an internal magnetic model once it has a fix. |
| General smartwatches with GPS | Compute their own position, usually single-frequency, with shorter battery life and worse accuracy. But the map on screen is often streamed from the phone, so out of range you can hold a good fix with nothing to plot it on. |
| Smartwatches without GPS | Nothing. Position comes entirely from the paired phone over a short-range link. Take the phone away and the watch does not know where it is, while still displaying a map and a compass exactly as before. |
That third row is where people get caught. An older watch and a current one from the same family look the same, show the same map, and report “your location” in the same words. One is computing a position from satellites; the other is asking the phone. Find out which one you own before it matters.
Two more things about watch compasses. The magnetometer sits inside a case full of metal, magnets and a haptic motor, so it needs periodic figure-eight calibration — and one that has not been calibrated can read ten to twenty degrees off before any declination correction is applied. And running the receiver continuously is expensive: on most watches it is a matter of one to two days rather than a week, and less again in multi-band mode. A watch is a quick-reference instrument, not a primary one.
2. Datum: the setting almost nobody checks
Latitude and longitude are angles measured against a mathematical model of the Earth’s shape. The Earth is not a sphere and is not quite an ellipsoid either, so any model is an approximation fitted to a purpose — and different countries, in different decades, fitted different models. That model, together with how it is anchored to the ground, is a datum.
Change the datum and you have not moved. You have changed the reference surface the same angles are measured against, which means the same digits now describe a different physical point.
Two datums matter to most members. WGS 84 is the modern global standard, the one satellites broadcast in, and the default on essentially every device sold today. NAD 27 is an older North American datum, and it is printed on a great many United States Geological Survey quadrangle sheets that are still in circulation, still sold, and still perfectly good maps in every other respect. Read a WGS 84 coordinate onto a NAD 27 sheet and you land somewhere else. At the entrance to Codorus State Park in southern Pennsylvania, the same coordinate string plots about 80 meters apart in the two datums. The size of the shift varies with where in the country you are standing, and some foreign datums differ by considerably more — but 80 meters is enough to put a team on the wrong side of a creek, and nothing on any screen mentions it.
The map states its datum, usually in the marginal information near the scale bar. That is the authority. Set the device to match the map you are actually plotting on — and when the map changes, check the setting again.
The reason this setting is so dangerous is that nothing about a datum mismatch looks like an error. The device reports a clean fix with a healthy accuracy figure. The coordinate is correctly formed and has the right number of digits. Plotted on the sheet it lands on plausible ground. Everything about the failure looks like success, which is why it survives right up until somebody walks to the point and finds nothing there.
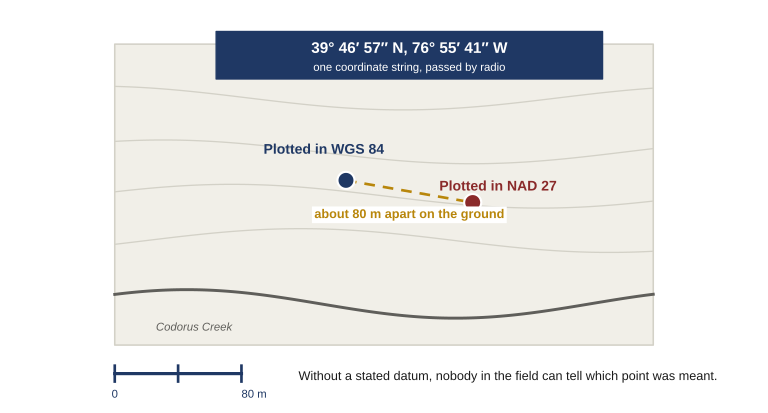
Figure 3.1 The size of the shift varies with where in the country you are standing, and some foreign datums differ by considerably more. This is the one setting that can be wrong while the fix, the coordinate and the plotted point all look perfectly healthy.
Format is a separate setting from datum and a separate class of error. A datum mismatch moves the point. A format mismatch usually means the receiving end cannot enter what you gave them, or enters it wrong. The position never changes; only the way it is written down.
Two of those will be unfamiliar. Maidenhead is what amateur radio operators trade, so it turns up the moment your group works a net — coarse, but instantly recognizable to a ham. Plus Codes come out of consumer mapping and are increasingly what a member of the public will read to you off a phone, because they work where there is no street address. Neither is a field navigation format, and both are worth recognizing rather than using.
Every line above is the same point on the ground. The first three are the same latitude and longitude sliced three different ways, and converting between them is arithmetic: sixty minutes to a degree, sixty seconds to a minute. The last two are grid systems, which project the curved surface flat and then count meters east and north from a fixed origin — so distances behave like distances on paper and you can measure them with a ruler.
Two traps in the lat/long family
The first is the missing sign. Written with hemisphere letters, a coordinate is unambiguous. Written as signed numbers, the minus on the longitude is doing all the work, and a coordinate copied without it plots on the far side of the world — the continental United States is entirely negative longitude, so a dropped sign puts your point in central Asia. Software wants signed numbers; paper and voice want hemisphere letters. Know which you are handing over.
The second is decimal minutes read as seconds. Someone reads 39 46.95 off a screen and it is written down as 39 46 95. That is not the same place, and it is not even valid, since seconds stop at 59 — but a tired dispatcher at three in the morning will not necessarily catch it. The fix is procedural: state the format out loud every time. “Three nine degrees, four six decimal nine five minutes north” cannot be misheard as seconds.
Know your own device well enough to switch
The table above guarantees one thing: sooner or later somebody will ask you for a format you are not currently displaying. There are two ways to be ready for that, and you want both.
The first is being able to change the format quickly, without hunting. Find that setting on your device now, change it, change it back, and do it again until you can do it without thinking. Then do it once in the dark with gloves on, because that is when it will matter. A member who has to go looking through menus while a dispatcher waits will read out whatever is already on the screen and hope, which is how the wrong format gets passed.
The second is better, where the device allows it: display two formats at once. Many handhelds let you place position readouts in the data fields at the top of the map page, and some offer a field that always reports latitude and longitude regardless of what the main position format is set to. Set one field to that and the other to the selected format, and you can read a grid to a search team and decimal degrees to a 911 center off the same screen, without changing a single setting mid-conversation.
That last point is the safety argument, not just a convenience. Changing settings under pressure is how a datum gets left on the wrong value afterwards. A screen that already shows both formats means you never have to touch the settings while somebody is waiting on the radio.
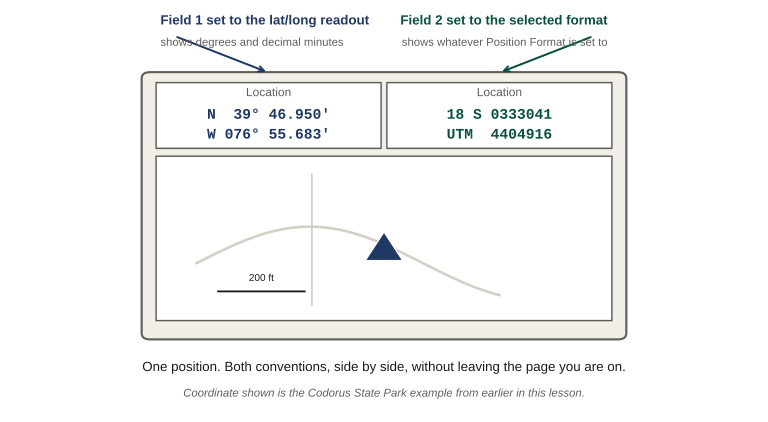
Figure 3.2 Configure this once and you never change a setting while somebody is waiting on the radio — which is the moment a datum gets left on the wrong value. Find the equivalent data fields on your own device and set them before you need them.
The worked example below is a Garmin GPSMAP 64st, because that is the device this course was built alongside. The specific menu names are that device’s; the two settings are not. Find the equivalents on whatever you carry and write them on your settings card.
| Step | On a GPSMAP 64st | What it does |
|---|---|---|
| 1. Set the primary format | Setup → Position Format | Three fields on one screen: Position Format, Map Datum and Map Spheroid. This is also where the datum from Section 2 lives, which is convenient and dangerous — check both while you are there. |
| 2. Read the format list carefully | Position Format → the list | The formats are shown as notation rather than names: hddd.ddddd° is decimal degrees, hddd°mm.mmm′ is degrees and decimal minutes, hddd°mm′ss.s″ is degrees-minutes-seconds. Then UTM UPS and a long list of national grids. |
| 3. Add the second readout | Map page → MENU → Change Data Fields | Set one field to the location readout that always shows latitude and longitude, and another to the location readout that follows the selected format. Both then appear across the top of the map page. |
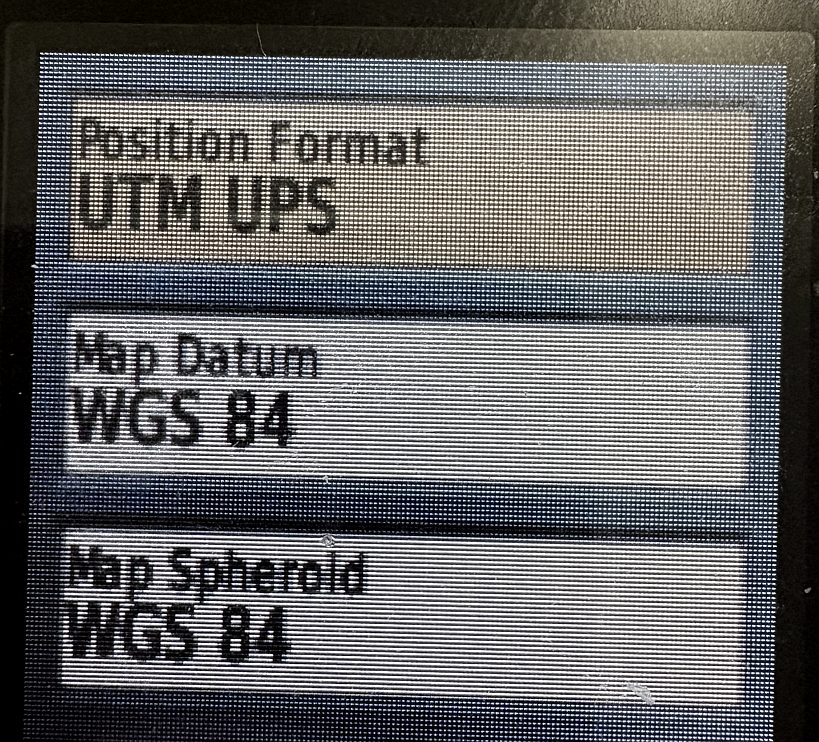
Figure 3.3 Step 1 on a GPSMAP 64st. Position format, datum and spheroid sit on one screen — which is why a member who came here to change the format should check the datum before leaving.
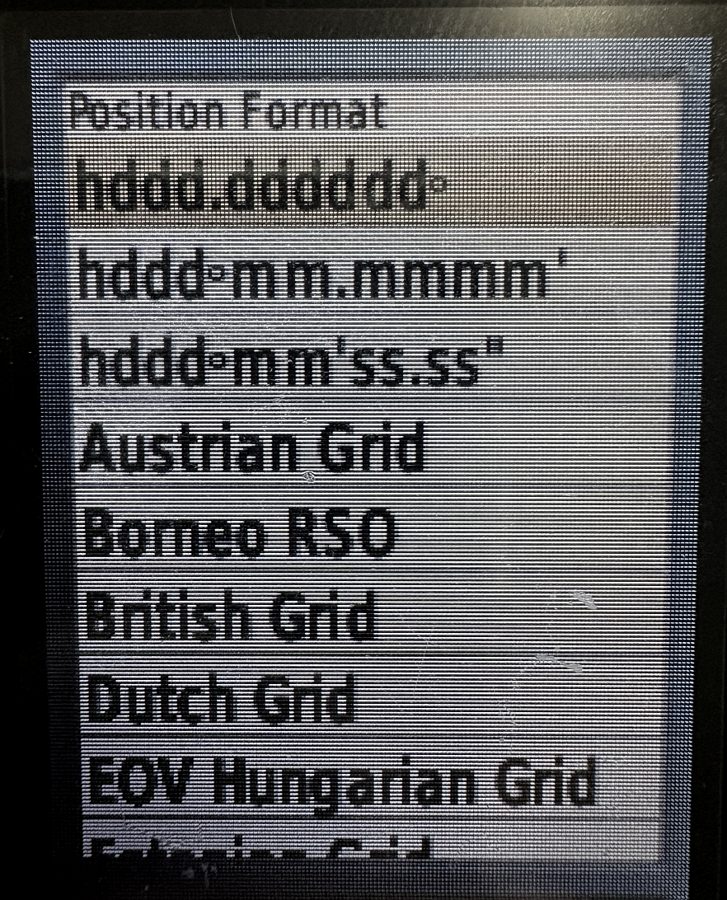
Figure 3.4 Step 2. The formats are listed as notation, not names: the first three entries are decimal degrees, degrees with decimal minutes, and degrees-minutes-seconds. Write the plain names beside them on your settings card so you are not translating under pressure.
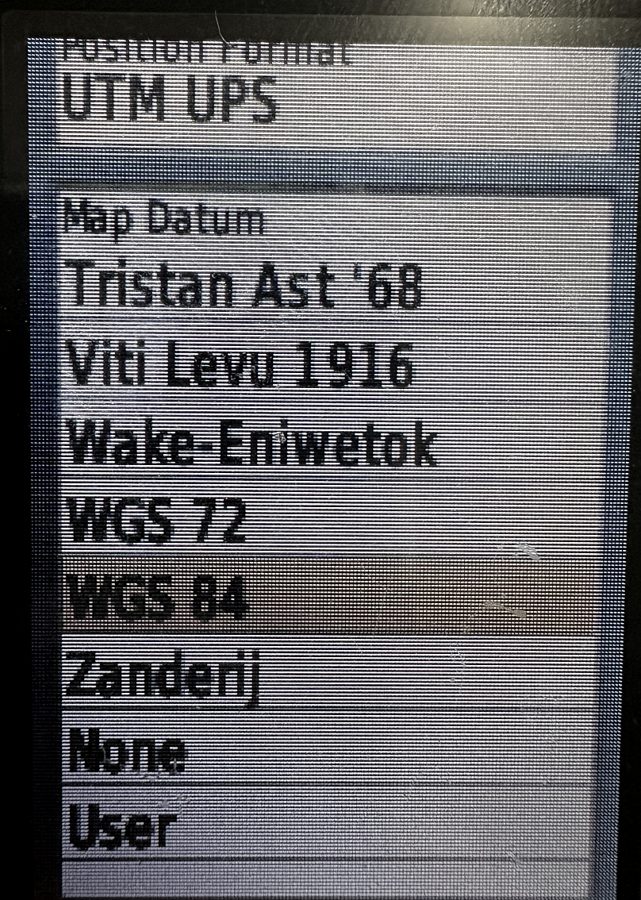
Figure 3.5 The datum list on the same screen. It runs to well over a hundred entries and WGS 84 sits near the bottom, alphabetically adjacent to datums that would put you on the wrong continent. Scrolling past it is easy; noticing afterwards is not.
A device that labels its formats hddd°mm.mmm′ rather than “degrees and decimal minutes” is asking you to translate under pressure. Put both the notation and the plain name on your settings card, so that when an aircraft asks for decimal minutes you know which line in the list that is without working it out.
Grid strings have a property the lat/long family lacks: precision is built into the number of digits, in clean factors of ten. You can shorten a grid reference deliberately and it still reads correctly, just coarser.
| String | Precision | What that covers |
|---|---|---|
| 18S TF | 100 km square | About 62 miles on a side. A region, not a location. |
| 18S TF 33 04 | 1 km square | About 0.62 miles on a side. A small neighborhood. |
| 18S TF 330 049 | 100 m square | About 330 feet on a side. One property or building footprint. |
| 18S TF 3304 0491 | 10 m square | About 33 feet on a side. An entrance, a vehicle, a staging position. |
| 18S TF 33041 04916 | 1 m square | About 3 feet on a side. Beyond what consumer receivers can honestly support. |
That last row is worth pausing on. A ten-digit grid claims one-meter precision. Nothing in Lesson 01 supports that claim from a handheld, so sending ten digits tells the receiving end you know something you do not. Send the precision you actually have.
Which format to give whom
All of this becomes a practical question the moment you have to hand a position to somebody outside your group. The governing rule is short: give them the format their system can accept, not the one you prefer. You convert; they should not have to.
| Who you are talking to | What to give them | Why |
|---|---|---|
| A 911 center | Decimal degrees | It is what phones produce and what dispatch software is built to ingest. Read the digits slowly and say “decimal degrees” before you start. |
| Air ambulance or any aircraft | Degrees and decimal minutes | Aviation and maritime convention. Pair it with an elevation and name the reference, per Section 5. |
| Federal or state response, mutual aid, urban search and rescue | USNG or MGRS | Unambiguous without local knowledge, which is the situation out-of-area help arrives in. Precision comes from the digit count. |
| Ground search and rescue | Ask — it varies | Often decimal minutes, sometimes grid. The incident action plan will specify; if nobody has, raise it before teams deploy. |
| A member of the public reading a phone | Take whatever they read you, verbatim | Decimal degrees or a Plus Code, most likely. Write down exactly what they say and convert at your end. Do not talk them through changing settings. |
| Your own group | Your published standard | One format, written down, with a stated fallback. Lesson 10 builds it. |
Four habits make the difference between a position that gets used and one that gets queried:
- Name the format before the numbers. “Decimal degrees, three nine point seven eight two five zero” cannot be misfiled the way a bare string can.
- Name the datum if there is any doubt, and default to WGS 84 in a group standard so there usually is not.
- Match precision to purpose. Five or six decimal places, or an eight-digit grid, is more than enough for anyone to drive, walk or fly to. Ten digits claims something your fix cannot support.
- Know how to switch your device’s format quickly, or configure it to display a second format alongside the first. Being able to read out grid and decimal degrees without leaving the screen you are on is worth practicing before you need it.
Lesson 07 covers the report formats these positions go inside — the medical evacuation request, the situation report, and passing a position over the radio without an error creeping in.
Federal incident response runs on USNG and MGRS, and for good reason: a grid square is unambiguous without knowing local road names, which is exactly the situation mutual aid arrives in. That is the doctrine.
The practice is that nearly everyone who is not a federal responder thinks and speaks in latitude and longitude. The caller reads decimal degrees off a lock screen. The deputy types degrees and minutes into a dispatch system. Your group will meet both worlds, so a group standard that names one format is not enough — it also has to say what you do when a position arrives in the other one.
4. North reference: three different norths
Your device has a setting for which north it reports bearings against, and there are three candidates. They are all correct; they are answers to different questions.
True north points at the geographic pole. Grid north points along the vertical grid lines on your map, which are straight lines drawn on a projection of a curved surface and therefore do not quite align with the pole. Magnetic north is where a compass needle points, which is a function of the Earth’s magnetic field and is neither of the other two.
The angle between true and magnetic is declination. The angle between grid and magnetic is the grid-magnetic angle, which is what a military map’s declination diagram gives you. Confusing the two is a small error most of the time and a real one occasionally.
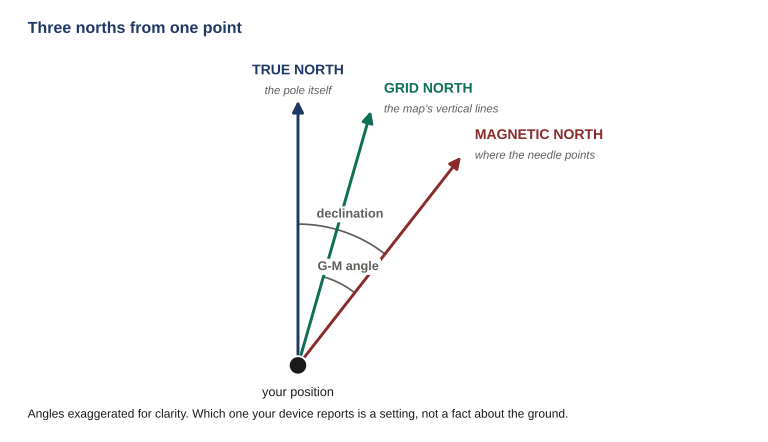
Figure 3.6 Three norths from one point, all of them correct answers to different questions. Declination is the angle from true to magnetic; the grid-magnetic angle is the one a gridded map sheet gives you. Which of the three your device reports is a setting you choose, not a fact about the ground.
Declination is not a constant. It varies enormously by where you are standing, and it drifts year over year as the magnetic field moves. Along a line running through the continental United States — the agonic line — declination is zero, and the sign flips as you cross it. East of it the needle points west of true; west of it the needle points east of true.
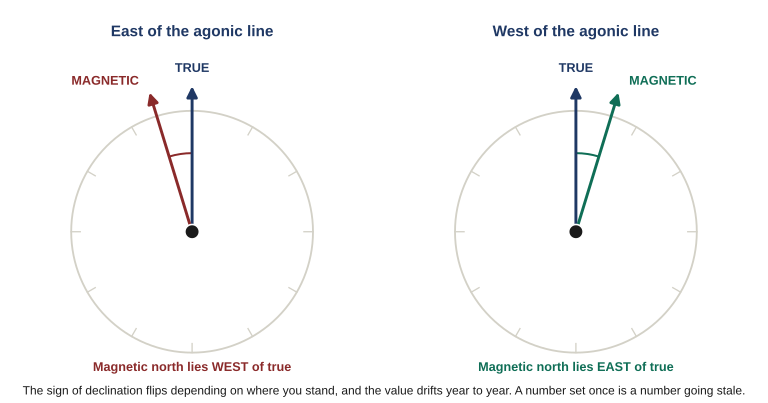
Figure 3.7 Cross the agonic line and the sign flips: the needle that leaned one side of true now leans the other. The value drifts year over year as well, so a declination typed in once and left alone is a number quietly going stale — which is what makes the next box a pre-trip check rather than a setup step.
Devices where you type the number in yourself
Most handhelds work declination out from your position and apply it silently. A large class of devices does not. Outdoor watches — Casio Pathfinder, Pro Trek and the compass-equipped G-Shocks, among others — ask you to enter a whole-degree value and a direction once, and then apply that number to every bearing forever. So do many baseplate compasses with an adjustable declination scale.
That is fine at home and a real problem the moment you travel, because the device has no idea you have moved. It will keep applying a stale number with complete confidence.
Set a watch to 14 degrees west on the East Coast, then use it unchanged in Colorado where declination is about 8 degrees east, and your bearings are not off by six degrees. They are off by twenty-two — because crossing the agonic line reverses which side of true north the needle sits on, so a correction that should now be adding is still subtracting. The two errors compound instead of partly canceling.
For scale: a 10-degree error puts you roughly 920 feet off after a single mile. Twenty-two degrees is about 2,100 feet, and every bearing is wrong by the same amount in the same direction — consistent enough to feel completely trustworthy right up until the leg ends somewhere it should not.
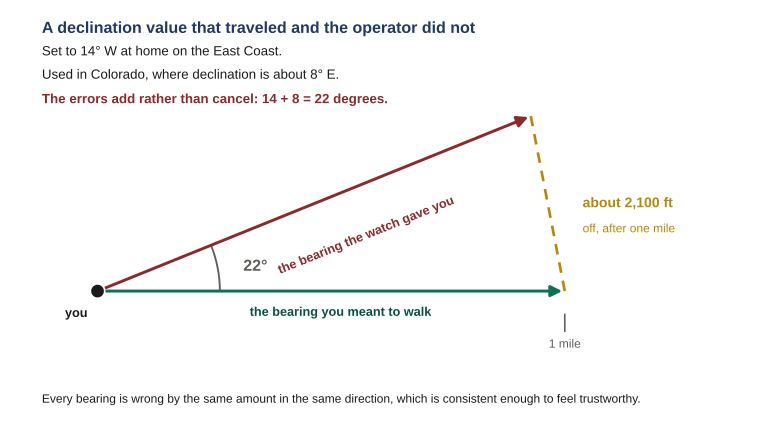
Figure 3.8 Crossing the agonic line reverses the direction the correction should be applied in, which is why the two values add instead of partly canceling. A device you type the value into by hand has no way of noticing you moved.
Two settings people conflate
There is a second setting on these devices that is not declination and gets confused with it constantly.
- Declination correction tells the device how far magnetic north is from true north where you are. It is a number you look up.
- Bearing sensor calibration tells the device where magnetic north actually is, as its own sensor sees it. It is a physical procedure — usually rotating the device through a set of positions.
If bearings are wrong after you have set declination correctly, calibration is the thing that has not been done. A device that has passed close to a speaker, a motor, or anything else with a strong magnet can be magnetized, and no amount of correct declination will fix a sensor that is reading the wrong north. Both settings have to be right, and getting one right tells you nothing about the other.
Practical rules for a manual-declination device. Look the value up properly rather than estimating — NOAA publishes a calculator that takes a ZIP code and returns a value to one decimal, and a topographic sheet gives it in the bottom margin along with the year it was measured and the annual rate of change. Enter whole degrees, rounding normally. Re-verify annually, since magnetic north drifts roughly a tenth of a degree a year across most of the country, and re-verify any time you move more than about a hundred miles east or west. Take bearings away from vehicles, steel and power lines. And treat the watch as a quick reference rather than a primary instrument — when it matters, cross-check it against a baseplate compass or a known direction.
One more thing that catches people: on Casio watches the procedure depends on the module number stamped on the case back, not on the model name printed on the dial. Two watches sold under the same family name can need different button sequences. The FFTP Casio declination quick card covers the common modules group by group; the point for this lesson is that you find your module number before you go looking for instructions.
What to actually set
The decision rule is about matching, not about which north is best:
- Set magnetic if you will be steering by a baseplate compass that has no declination adjustment. The device and the compass then speak the same language and you do no arithmetic in the field.
- Set true if your compass has an adjustable declination scale and you have set it, or if you are working primarily with software and imagery.
- Set grid if you are working closely off a gridded map sheet and passing bearings that others will plot on that sheet.
Whichever you choose, the group chooses the same one and writes it down. Mixed north references inside one group produce bearings that are individually correct and collectively useless.
5. Units, angle units, and which elevation you mean
Distance units are the least dangerous setting here and the most likely to cause friction. Miles against kilometers, feet against meters — none of it will lose anybody, but all of it slows a radio exchange that should take fifteen seconds. Pick one and standardize. Two other settings in this family are less obvious and matter more.
Degrees or mils
Most devices will report bearings in mils as well as degrees. A mil is an angular unit built for range work — one mil subtends one unit of width at a thousand units of range, which makes the arithmetic for ranging and adjustment trivial, and is why artillery and precision shooters use it.
The trap is that “a mil” is not one thing. NATO and US forces use 6,400 mils to a circle and that is what a handheld set to mils is almost certainly displaying. The former Soviet standard is 6,000. Sweden and Finland use 6,300, and a true milliradian is about 6,283. Pass bearings between someone on 6,400 and someone on 6,000 and every one of them is off by roughly seven percent, with nothing to indicate it.
Unless your group has a specific reason to work in mils, work in degrees. If you do use mils, write down which system, because the number alone does not tell anyone.
Three different altitudes
Elevation is the setting people assume has one meaning. It has three, and your device can display more than one of them.
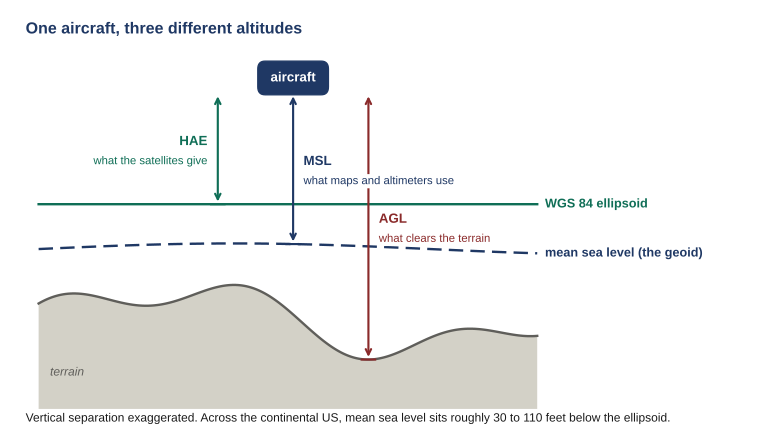
Figure 3.9 One aircraft, three correct altitudes. The satellites compute the first, maps and altimeters use the second, and only the third tells you whether you clear the ridge. Passing any of them without naming which one leaves the receiving end to guess.
| Reference | What it measures | Where you meet it |
|---|---|---|
| Ellipsoid height (HAE) | Height above the smooth mathematical model of the Earth’s shape | What the satellites actually compute. Raw output, before any correction. |
| Orthometric height (MSL) | Height above mean sea level, which follows the Earth’s uneven gravity field | Every contour on every topographic map. Aviation altimeters. What people mean by “elevation.” |
| Height above ground (AGL) | Height above whatever terrain is directly below you | Aviation and drone operations, obstacle clearance, hoist work. |
The first two differ because the satellites compute against a smooth mathematical shape while sea level follows gravity, and the planet’s mass is not evenly distributed. Across the continental United States, mean sea level sits roughly 30 to 110 feet below that mathematical surface, varying by location. Receivers carry a model of the difference and subtract it automatically, which is why most handhelds show something close to map elevation out of the box — but the setting exists, it is usually buried under a name like altitude reference or elevation source, and some units default the other way.
A ground team reporting “elevation 1,200 feet” almost certainly means sea level, because that is what came off their map. A drone operator reporting “altitude 400 feet” almost certainly means above ground, because that is the regulatory ceiling and what their controller shows. A helicopter works on sea level altimetry. Same word, three references, three operationally different numbers — and the gap between them is exactly the height of the thing you were trying not to hit.
Say which one you mean, every time, the same way you say the coordinate format. When passing terrain and obstacle heights to aircraft, use sea level unless they ask for something else.
Barometer mode, if your device has one
Devices with a barometric altimeter usually offer two modes, and the choice matters. Variable elevation assumes you are moving and treats pressure changes as changes in height — correct for navigation. Fixed elevation assumes you are stationary and treats pressure changes as weather, which turns the device into a barometer for forecasting and makes its elevation readout useless while you walk. Set it to variable for movement, and know which mode it is in before you trust either number.
Finally, set the clock format and time zone your group works in, and decide now whether that is local time or a single reference zone. A report with an ambiguous timestamp is a report somebody has to query.
6. The settings card
All of this is worthless as knowledge and valuable as a filled-out card taped inside the case. Complete one per device. Complete a second one for the phone you would actually use.
| Setting | What to record | Yours |
|---|---|---|
| Device | Make, model, firmware version | |
| Map datum | Must match the sheet you plot on. Note which sheet. | |
| Coordinate format | The group standard, plus the fallback you accept from outsiders | |
| North reference | True, grid, or magnetic — and why that one | |
| Distance units | Group standard | |
| Elevation units | Group standard | |
| Elevation reference | Sea level or ellipsoid, and barometer mode if fitted | |
| Angle units | Degrees, or mils and which mil system | |
| Satellite systems | Which mode, from your Lesson 02 drill | |
| Augmentation (SBAS) | On or off, and the reason | |
| Battery type | Chemistry fitted, and what the device is told it has | |
| Checked on | Date. Re-check before any trip that changes map sheets or regions. |
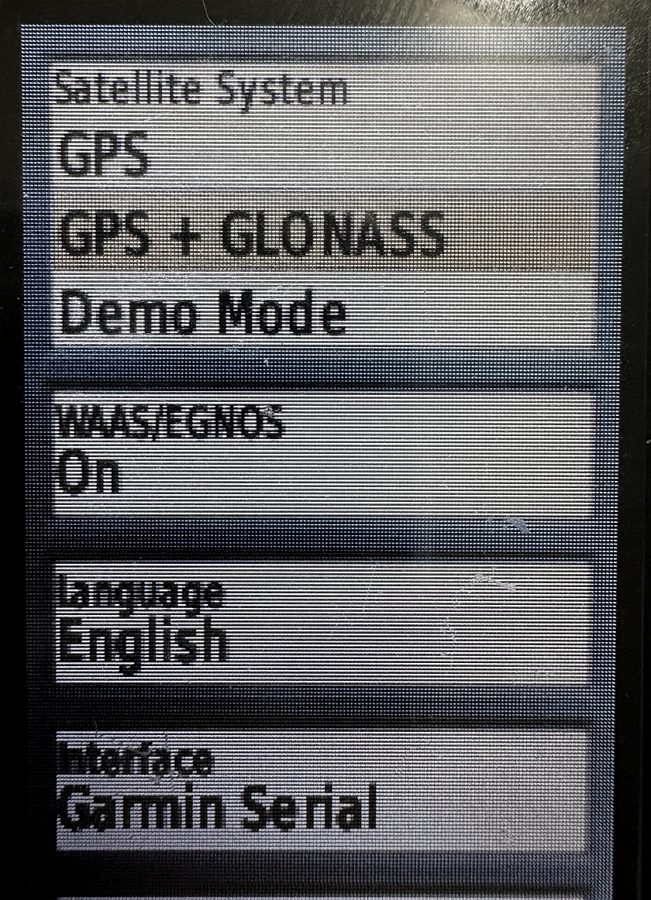
Figure 3.10 Two more card rows on one screen: which satellite systems the receiver uses, and whether SBAS is enabled. Both were decisions in Lesson 02; this is where they get recorded and re-checked.
The reference article The Constellations Above You carries the full treatment of everything in this lesson: the complete coordinate-format comparison including Maidenhead and Plus Codes, worked conversions between the lat/long variants, the three definitions of altitude and when each matters, barometer modes, and the settings walkthrough by use case.
If one section of it is worth reading before you go on, make it the datum section. If you carry a Casio outdoor watch, the FFTP Casio declination quick card gives the button sequence for your module and folds into a go-bag.
- Datum is the setting that can be wrong while the fix, the coordinate and the plotted point all look healthy. Match it to the sheet you are plotting on, and check it again when the sheet changes.
- Give people the format their system accepts: decimal degrees to a 911 center, decimal minutes to an aircraft, USNG to federal response. You convert, not them.
- Send the precision your fix has earned. Ten digits from a handheld claims a meter you do not have.
- Set your north reference to match how you will actually steer, and if you type declination in by hand, treat it as a pre-trip check rather than a setup step.
- Say which elevation you mean. Sea level and above-ground differ by the height of the terrain under you.
This is the deliverable for this lesson, and Lesson 10 assumes you have it.
- Fill out the card above for the handheld or phone you actually carry. Every row. Where you cannot find a setting, write down that you could not find it — that is a real finding.
- Take out the paper map you would actually use for your area and find its datum in the marginal information. Write it on the card. If your device does not match it, change one of them now and note which.
- Fill out a second card for your alternate device. Compare the two. Any row where they differ is a row where two members of the same group would report the same ground differently.
- Write one sentence naming the coordinate format your group will use, and one more saying what you do when a position arrives from outside in a different one.
Keep this with the sheets from Lessons 01 and 02. Together they are the first draft of the group standard you publish in Lesson 10.
| ← Lesson 02: The Constellations Above You |